My brother was working on a simple desktop app that needed popup notifications and as we were brainstorming ideas, my fondness for web-apps prompted me to look into the webkit notification API (and try to convince him to make the app into a web-app).
I've written up a short tutorial for the webkit notification API below. The API is currently only supported by Google Chrome, but it's pretty cool and hopefully will be adopted by other browsers. Basically it lets you pop-up a small notification (after requesting permission) as an always-on-top window separate from the browser window. It looks like this:
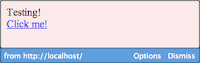 and it shows up in the upper right corner on Macs or the lower right corner in Windows.
For the impatient, here's a quick demo: (remember, only works in Chrome)
From this point on, I'm going to make the (terrible) assumption that all of our app's visitors are using Chrome so we don't have to worry about checking browser support or degrading gracefully.
So how do you show a basic notification? First you need to request permission from a user with

There's one very important caveat about requesting permission: the page can only request permission when a user initiates some action on a page, e.g. clicking on a button. This means you can't have your page request permission when it loads.
So we'll make a button for requesting permission like this: (assume jQuery is already included)
Which looks like:
(In my opinion, this is the biggest shortcoming of the API that may prevent its widespread adoption in web-apps - it makes no sense that the user has to prompt the app to ask him for permission by clicking something. The way it should work is that the browser automatically asks the user for permission the first time an app tries to display a notification, and that permission preference is saved. If the user denies notifications, then the app can only request permission again by having the user click a "notifications settings" button, or if a notification is to be displayed as the result of a user action, e.g. if a button's click handler tries to display a notification.)
The
The next part of the API that's important is the function
This will use an old-fashioned alert to tell the viewer to turn on notifications if they're not allowed when the page loads. (Please don't actually do this on your site - it's really annoying)
Let's get to displaying notifications!
We'll use the function
Here's a little demo:
The source code is simple:
You can set up callbacks by setting the
In practice you wouldn't want to do something so annoying, but the ondisplay and onclose callbacks can be used to integrate the notifications into your web app better and let the app know when the notifications are closed.
Code:
The last thing I'll demonstrate is an HTML notification, which allows you to specify another webpage to load in the notification window instead of just plaintext. Use the
Code:
There are limitations to what the page loaded in the notification window can do. For example, it's not possible to access the HTML5
So that's the basics of webkit notifications, hopefully you can put them to good use in your own web-apps!
For more info, check out http://0xfe.blogspot.com/2010/04/desktop-notifications-with-webkit.html or http://www.thecssninja.com/javascript/web-notifications
I've written up a short tutorial for the webkit notification API below. The API is currently only supported by Google Chrome, but it's pretty cool and hopefully will be adopted by other browsers. Basically it lets you pop-up a small notification (after requesting permission) as an always-on-top window separate from the browser window. It looks like this:
 and it shows up in the upper right corner on Macs or the lower right corner in Windows.
For the impatient, here's a quick demo: (remember, only works in Chrome)
From this point on, I'm going to make the (terrible) assumption that all of our app's visitors are using Chrome so we don't have to worry about checking browser support or degrading gracefully.
So how do you show a basic notification? First you need to request permission from a user with
window.webkitNotifications.requestPermission();This will cause the browser to ask the user for permission:
There's one very important caveat about requesting permission: the page can only request permission when a user initiates some action on a page, e.g. clicking on a button. This means you can't have your page request permission when it loads.
So we'll make a button for requesting permission like this: (assume jQuery is already included)
<button id="notifSettings">Change notification settings</button>
<script>
$("#notifSettings").click( function(){
 window.webkitNotifications.requestPermission();
});
</script>
Which looks like:
(In my opinion, this is the biggest shortcoming of the API that may prevent its widespread adoption in web-apps - it makes no sense that the user has to prompt the app to ask him for permission by clicking something. The way it should work is that the browser automatically asks the user for permission the first time an app tries to display a notification, and that permission preference is saved. If the user denies notifications, then the app can only request permission again by having the user click a "notifications settings" button, or if a notification is to be displayed as the result of a user action, e.g. if a button's click handler tries to display a notification.)
The
requestPermission(callback) function also optionally accepts a callback function which is called after the user chooses to allow or deny notifications. The next part of the API that's important is the function
window.webkitNotifications.checkPermission();. This allows you to check if notifications are allowed - it returns a non-zero integer if they are NOT allowed. So if notifications are really vital to your app, you might prod the user to enable them with code like this:
$(document).ready( function(){
 if (window.webkitNotifications.checkPermission() != 0){
   alert("Please enable webkit notifications!");
 }
});
This will use an old-fashioned alert to tell the viewer to turn on notifications if they're not allowed when the page loads. (Please don't actually do this on your site - it's really annoying)
Let's get to displaying notifications!
We'll use the function
window.webkitNotifications.createNotification(icon, title, body). This function call returns a notification object which we then show by calling its .show() method. That object also allows us to setup callbacks - I'll demonstrate this in a bit.Here's a little demo:
The source code is simple:
<button id="notify" onclick="return false;">Notify me!</button>
<button id="notifSettings2" onclick="return false;">Change notification settings</button>
<script type="text/javascript">
$("#notifSettings2").click( function(){
  window.webkitNotifications.requestPermission();
});
$("#notify").click( function(){
  if (window.webkitNotifications.checkPermission() != 0){
    alert("Oops! Please enable notifications by clicking the 'Change notification settings' button!");
  } else {
    window.webkitNotifications.createNotification("http://www.blogger.com/img/icon_logo32.gif", "Notification title", "Notification text!").show();
  }
});
</script>
You can set up callbacks by setting the
ondisplay, onclose, or onerror properties of the notification. For example, we can make a really annoying "non-dismissible" notification that reopens when the user click "Dismiss":In practice you wouldn't want to do something so annoying, but the ondisplay and onclose callbacks can be used to integrate the notifications into your web app better and let the app know when the notifications are closed.
Code:
<button id="startMadness" onclick="return false;">Start the madness!</button>
<button id="stopMadness" onclick="return false;">Stop the madness!</button>
<button id="notifSettings3" onclick="return false;">Change notification settings</button>
<script type="text/javascript">
$("#notifSettings3").click( function(){
  window.webkitNotifications.requestPermission();
});
var notification = null;
var notify = function(){
  if (window.webkitNotifications.checkPermission() != 0){
    alert("Oops! Please enable notifications by clicking the 'Change notification settings' button!");
  } else {
    notification = window.webkitNotifications.createNotification("http://www.blogger.com/img/icon_logo32.gif", "Notification title", "Try dismissing me!");
    notification.onclose = notify; //make the onclose event trigger the notify function again - madness!
    notification.show();
  }
};
$("#startMadness").click( notify );
$("#stopMadness").click( function() {
  notification.onclose=null; //clear the onclose event handler
  notification.cancel(); //close the notification
});
</script>
The last thing I'll demonstrate is an HTML notification, which allows you to specify another webpage to load in the notification window instead of just plaintext. Use the
window.webkitNotifications.createHTMLNotification(url) function.Code:
<button id="htmlNotif" onclick="return false;">HTML Notification!</button>
<button id="notifSettings4" onclick="return false;">Change notification settings</button>
<script type="text/javascript">
$("#notifSettings4").click( function(){
   window.webkitNotifications.requestPermission();
});
$("#htmlNotif").click( function(){
  if (window.webkitNotifications.checkPermission() != 0){
    alert("Oops! Please enable notifications by clicking the 'Change notification settings' button!");
  } else {
    window.webkitNotifications.createHTMLNotification("http://scottbezek.com/webkit_notification.htm").show();
  }
});
</script>
There are limitations to what the page loaded in the notification window can do. For example, it's not possible to access the HTML5
localStorage from javascript within the notification. Also, it's not possible to type into form textboxes in the notification window, which is unfortunate.So that's the basics of webkit notifications, hopefully you can put them to good use in your own web-apps!
For more info, check out http://0xfe.blogspot.com/2010/04/desktop-notifications-with-webkit.html or http://www.thecssninja.com/javascript/web-notifications
How to set desktop notification for local HTM file?
ReplyDeletegetting error: "SECURITY_ERR: DOM Exception 18"
actually I am trying to set notification for a chrome extension.
hi actually m trying to embedd html in createNotification(here ) in paramaeter i want hyperlinks on clicked it vl go to respective site . is it possible in this .
ReplyDelete